1
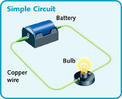
First, to build a simple circuit, you will need these Certain materials. A power source of any type, two insulated wires, a small light bulb, and a light bulb holder. A power source can be any type of battery, battery pack, or generator etc. The rest of the materials can be found at any local hardware store.
2
Strip off the ends of the insulated wires very carefully. In order for your circuit to work properly, the wires need to be totally exposed so you must strip the ends of the insulation. Using wire strippers (or scissors), remove about as close as you can get to an inch of the insulation from the ends of each of the wires. If you don’t have any wire strippers, you can very carefully use scissors to cut off the insulation on the wires. Make sure to Be careful not to cut all the way through the wire. If you do get a new wire.
3
Install your batteries into your battery pack that you have. If you are using more than one battery, you will need a power pack to hold the all of your batteries in. Push each and every battery in the side correctly. If it doesn't light in the end try to change the batteries around in the battery pack.
4
Attach your red and black (or whatever kind of color wires you have) wires to the battery pack. The wires will be conducting the electric current from the batteries to the light bulb. The easiest way to attach the wires is to use electrical tape if you have it available. Attach the end of one wire to one side of the battery, making sure that the wire maintains in contact with the metal part of the battery. Repeat with the other wire on the other opposite side of the battery. Use a lot of caution while building your circuit. Although it is very very unlikely, it is still possible to get a very small shock if you touch the wire directly while attached to your the battery. You can avoid this by only touching the insulated part of the wire or by removing all the batteries until you install the light bulb.
5
Fasten the other end of the wire very tightly to the metal screw of the light bulb holder. Take the exposed non-insulated metal end of each wire and bend it into a U kind of shape. Loosen each of the screws on the light bulb holder as little as possible to slip the U-shape part of the wire around the metal screw. Each wire will be attached to its very own metal screw. Tighten the screw all the way, ensuring that the metal of the wire remains in a very good contact with the metal screw.
6
Test your circuit with super great care. You have make sure to screw the lightbulb into its holder until it is as tight as can be. If your circuit is hooked up properly, the bulb will have to light up when fully screwed into its holder. Also make sure you have fully charged batteries.
